こんにちは、株式会社Pentagonでアプリ開発をしているyoshidaです。
flutter_stripeはFlutterアプリにオンライン決済を比較的簡単に導入できる
パッケージです。
支払い方法はApple PayやGoogle Payもサポートされていますが、今回は需要が多いクレジットカードの実装をご紹介します。
【こんな人に読んで欲しい】
手軽に支払い画面UIを組み込みたい!
オンライン決済をモバイルアプリケーションに簡単に導入したい!
【この記事を読むメリット】
これから支払いシステムを導入しようと検討している方は、目を通しておくとスムーズに実装できると思います!
【結論】
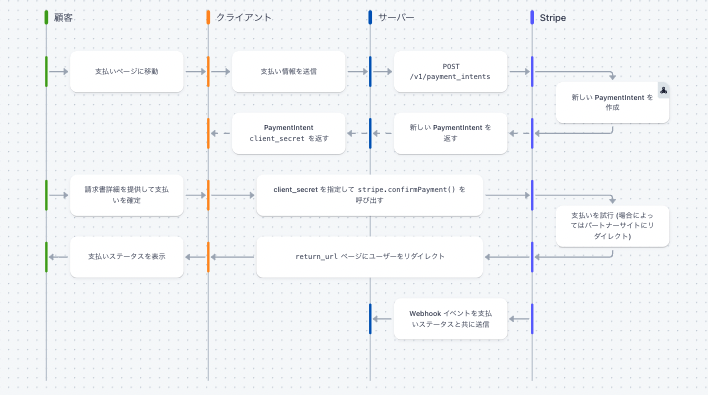
①支払い情報をサーバーに渡す。(APIを叩いて支払い方法を受け付け)
②支払いを確定させる。(支払いメソッドに①の結果を渡して支払い完了!)
下記、実装に登場する主なオブジェクトです。
Payment Methods 1 つの API でさまざまな支払い方法を受け付けることができます。
支払いを作成するための支払い方法詳細が含まれます。
PaymentIntent (支払いインテント) 複雑な決済フローを処理できる組み込みを構築します。
支払いの作成から決済までを追跡し、必要に応じて追加の認証ステップをトリガーします。
- パッケージはこちら(https://pub.dev/packages/flutter_stripe)
- ドキュメント(https://stripe.com/docs/keys#obtain-api-keys)
- stripe開発者ページ(https://dashboard.stripe.com/test/dashboard)
- stripe API(https://stripe.com/docs/api/payment_intents)
導入方法について
パッケージをインストールする
パッケージをインストール!
dart pub add flutter_stripeAndridの設定
1.Android 5.0(APIレベル21)以降を使用する
android/app/build.gradle
minSdkVersion 212.Kotlinバージョン1.5.0以降を使用する
android/build.gradle
ext.kotlin_version = '1.5.0'3.Theme.AppCompatの子孫をアクティビティに使用する
android/app/src/main/res/values-night/styles.xml
<style name="NormalTheme" parent="Theme.MaterialComponents">4.最新のAndroidGradleビルドツールバージョンの使用
android/build.gradle
distributionUrl=https\://services.gradle.org/distributions/gradle-7.4-all.zip5.MainActivity.ktでFlutterActivityの代わりにFlutterFragmentActivityを使用する
android/app/src/main/kotlin/com/flutter/stripe/example/MainActivity.kt
import io.flutter.embedding.android.FlutterFragmentActivity

class MainActivity: FlutterFragmentActivity() {
flutter pub getiosの設定
iOS11以降を対象とするアプリと互換性があります。
支払いまでの実装方法について
1.mainに初期化を記述
公開可能keyをmainに記述します。
main.dart
Future<void> main() async {
Stripe.publishableKey = "pk_test_xxxxxxxxxxxxxxxxxxxxxxxxxxxxxxxxxxxxxxxxxxxx"
await Stripe.instance.applySettings();
runApp(MyApp());
}
2.viewの実装
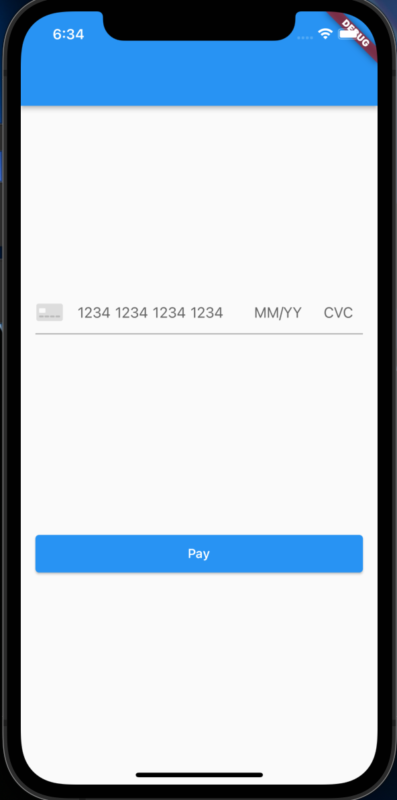
CardFeild()を呼び出すだけで、カード情報を入力するUIが簡単に
作成できます!
Column(
         crossAxisAlignment: CrossAxisAlignment.stretch,
         children: [
           SizedBox(height: 200),
           Padding(
             padding: const EdgeInsets.symmetric(horizontal: 16),
             child: CardField(),
           ),
           SizedBox(height: 200),
           Padding(
             padding: EdgeInsets.all(16),
             child: LoadingButton(
               onPressed: _handlePayPress,
               text: 'Pay',
             ),
           ),
         ],
       ),
3.【pay】ボタンを押した時の処理
CardDetails _card = CardDetails();Future<void> _handlePayPress() async {
await Stripe.instance.dangerouslyUpdateCardDetails(CardDetails(
//ダミーのカード情報
number: '4242424242424242',
expirationYear: 25,
expirationMonth: 03,
cvc: '111',
));
try {
// 1. 顧客の請求情報を収集する
final billingDetails = BillingDetails(
email: 'email@stripe.com',
phone: '+48888000888',
address: Address(
city: 'Houston',
country: 'US',
line1: '1459 Circle Drive',
line2: '',
state: 'Texas',
postalCode: '77063',
),
); // ダミー
// 2. お支払い方法の作成
final paymentMethod = await
Stripe.instance.createPaymentMethod(PaymentMethodParams.card(
paymentMethodData: PaymentMethodData(
billingDetails: billingDetails,
),
));
// 3. APIを呼び出してPaymentIntentを取得
final paymentIntentResult = await createPaymentIntent();4.paymentIntentを取得するAPIの実装
 final kApiUrl = Uri.https('api.stripe.com', 'v1/payment_intents');

  Future<Map<String, dynamic>> createPaymentIntent() async {
   final body = <String, dynamic>{
     'amount': '2000',
     'currency': 'jpy',
     'payment_method_types[]': 'card',
   };

   final response = await http.post(
     kApiUrl,
     headers: {
       'Authorization': 'Bearer $secretKey',
       'Content-Type': 'application/x-www-form-urlencoded',
     },
     body: body,
   );
   final paymentIntent = jsonDecode(response.body);
   return paymentIntent;
 }
5.支払い処理の実装
confirmPaymentメソッドに4で取得したpaymentIntentResult[‘client_secret‘]と支払い方法を指定するパラメーターを渡します。
final confirmResult = await Stripe.instance.confirmPayment(
       paymentIntentResult['client_secret'],
       PaymentMethodParams.card(
           billingDetails: billingDetails,
           setupFutureUsage: PaymentIntentsFutureUsage.OffSession),
     );
支払いが成功するとconfirmResult.statusに”Succeeded”が返ってきます!

まとめ
flutter_stripe SDKはFlutterアプリに比較的簡単で安全に支払いを導入できるパッケージです。今回の実装の中ではエラーハンドリングの処理はしていませんが、少ないコードで実装が可能です。他にも支払いオプションを追加することもできるので、決済機能をご検討の方はお試しください!
おまけ
Flutterに関する知識を深めたい方には、『Flutterの特徴・メリット・デメリットを徹底解説』という記事がおすすめです。
この記事では、Flutter アプリ開発の基本から、Flutter とは何か、そして実際のFlutter アプリ 事例を通じて、その将来性やメリット、デメリットまで詳しく解説しています。
Flutterを使ったアプリ開発に興味がある方、またはその潜在的な可能性を理解したい方にとって、必見の内容となっています。
ぜひ一度ご覧ください。

