こんにちは、株式会社Pentagonの山本です。
GoRouterとRiverpodを使ってアプリ開発をしていましたが、GoRouterでどのようにデータを次の画面に渡すのか、そして渡したデータをどうのようにstateにセットすれば良いのかわからなかったので、その方法をまとめました。
【こんな人に読んで欲しい】
- 画面遷移時にデータを次の画面に渡したい人
【この記事を読むメリット】
この記事を読めば、GoRouterで画面遷移する際にデータを次の画面に渡す方法、そのデータをstateに格納し扱う方法がわかります。
【結論】
結論から言うと、GoRouterでは、extraを使ってデータを渡し、ConsumerStatefulWidgetのinitStateで、データをstateに格納します。
GoRouterで画面遷移時にデータを渡す
以下では、VideoListScreenからVideoPlayingScreenに画面遷移する場合を想定します。VideoListScreenからVideoPlayingScreenに遷移するときに、再生をするVideoのデータを送るものとします。
まずは、VideoPlayingScreenに画面遷移する時、必要なデータを管理するクラスを作成します。これをVideoPlayingScreenArgsとします。VideoPlayingScreenを初期化する際に、をVideoPlayingScreenArgsを渡せるようにコンストラクタを記述します。
class VideoPlayingScreenArgs {
 VideoPlayingScreenArgs({
   required this.playingVideo,
 });
 final Video playingVideo;
}

class VideoPlayingScreen extends ConsumerStatefulWidget {
 const VideoPlayingScreen({Key? key, this.args}) : super(key: key);

 final VideoPlayingScreenArgs? args;

 @override
 VideoPlayingScreenState createState() => VideoPlayingScreenState();
}
アプリのルーターを定義している箇所で、extraを経由してVideoPlayingScreenArgsを渡せるようにします。
GoRoute(
       path: videoPlaying,
       builder: (context, state) {
         return VideoPlayingScreen(
           args: state.extra as VideoPlayingScreenArgs?,
         );
       },
     ),
次のコードでvideoのインスタンスを画面遷移時にextraとして渡すことができます。
context.push(
AppRouter.videoPlaying,
      extra: VideoPlayingScreenArgs(playingVideo: video)
);

RiverpodでProvider, State, Notifierを用意
状態管理にRiverpodを使うため、Provider, State, Notifierを用意します。
part 'video_playing_screen_model.freezed.dart';

// -----------------------------------------------------------------------------
// Provider
// -----------------------------------------------------------------------------
final videoPlayingScreenModelProvider = NotifierProvider.autoDispose<
   VideoPlayingScreenModelNotifier, VideoPlayingScreenModelState>(() {
 return VideoPlayingScreenModelNotifier();
});

// -----------------------------------------------------------------------------
// State
// -----------------------------------------------------------------------------
@freezed
class VideoPlayingScreenModelState with _$VideoPlayingScreenModelState {
 const factory VideoPlayingScreenModelState({
   Video? playingVideo,
 }) = _VideoPlayingScreenModelState;
}

// -----------------------------------------------------------------------------
// Notifier
// -----------------------------------------------------------------------------
class VideoPlayingScreenModelNotifier
   extends AutoDisposeNotifier<VideoPlayingScreenModelState> {

 @override
 VideoPlayingScreenModelState build() {
   return const VideoPlayingScreenModelState();
 }

 void setInitialState(
   Video? playingVideo
 ) {
   state = state.copyWith(
     playingVideo: playingVideo
   );
 }
}
ConsumerStatefulWidgetを継承して画面を構築
ConsumerStatefulWidgetを継承し、initState()内で、画面遷移時に受け取ったデータをstateの中に投入していきます。
class VideoPlayingScreenArgs {
VideoPlayingScreenArgs({
required this.playingVideo,
});
final Video playingVideo;
}
class VideoPlayingScreen extends ConsumerStatefulWidget {
const VideoPlayingScreen({Key? key, this.args}) : super(key: key);
final VideoPlayingScreenArgs? args;
@override
VideoPlayingScreenState createState() => VideoPlayingScreenState();
}
class VideoPlayingScreenState extends ConsumerState<VideoPlayingScreen> {
@override
void initState() {
super.initState();
Future(
() {
ref.read(videoPlayingScreenModelProvider.notifier).setInitialState(
widget.args?.playingVideo
);
},
);
}
@override
Widget build(BuildContext context) {
return Container();
}
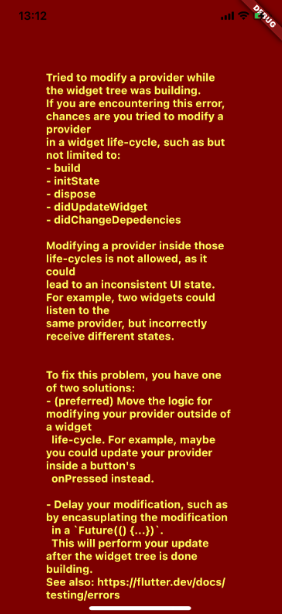
}stateにデータを反映する際に、Futureで囲まないと、次のようなエラーが発生するので、気をつけてください。
まとめ
以上、GoRouterでデータを次の画面に渡し、Riverpodを使ってstateに投入し管理する方法を紹介しました。GoRouterでintを渡す例などはありましたが、extraを使って複雑なデータを渡すサンプルが少なかったので、本記事を書きました。Flutterでの開発のヒントになれば幸いです。